
Managed identities in Azure make it easy for your virtual machines (VMs) to securely access Azure services—without storing any credentials in your code. In this post, we’ll walk through what a managed identity is and how to assign one to an Azure VM in just a few clicks.
🔍 What is a Managed Identity?
A Managed Identity is a feature in Azure Active Directory (Azure AD) that automatically manages credentials for Azure resources. When enabled, your VM can authenticate to Azure services like Key Vault, Storage Account, or SQL Database using its own identity.
There are two types:
- System-assigned Managed Identity – tied directly to the VM. If the VM is deleted, the identity is deleted too.
- User-assigned Managed Identity – created as a standalone resource that can be shared across multiple VMs.
🧭 Step 1: Go to Your Virtual Machine
- Sign in to the Azure Portal at https://portal.azure.com.
- In the left menu, click Virtual Machines.
- Select the VM you want to assign a managed identity to.
⚙️ Step 2: Enable the Managed Identity
- In the VM’s left-hand menu, scroll down and click Identity under Security.
- Under the System assigned tab, you’ll see a switch labeled Status.
- The value of Status should be On. If it is Off, toggle it to On and click Save. We are using a system-assigned managed identity for our VM here.
Note: If you want to use a User-assigned Managed Identity, do this instead:
- Go to the User assigned tab.
- Click + Add.
- Choose your user-assigned identity from the list and click Add.
If we do not have a system assigned managed identity, we can create a User-Assigned Managed Identity as follows:
- In the Azure Portal, search for Managed Identities in the top search bar.
- Click + Create.
- Choose your Subscription and Resource Group.
- Enter a Name for your identity.
- Choose a Region (select same as your VM’s region).
- Under Isolation Scope, select one of the following:
- None – The identity can be used across multiple regions.
- Regional – The identity is isolated to a specific region for added security and compliance.
- Click Review + Create, then Create.
🔑 Step 3: Give the Identity Permission to Access Azure Resources
A Managed Identity doesn’t automatically have permission to access Azure resources.
You need to explicitly grant it the proper role using Role-Based Access Control (RBAC).
You can allocate permissions by going to your Management Group, Subscription, Resource Group, or individual Resource, and then opening Access control (IAM) from the left sidebar.
Please follow the below steps:
- In the Azure Portal, go to your Management Group, Subscription, Resource Group, or individual Resource, and open Access control (IAM) from the left sidebar.
- Click + Add → Add role assignment.
- Under Role, select the appropriate role such as Reader, Contributor, or a service-specific role like Storage Blob Data Reader.
- Under Members, choose Managed identity.
- Select System Assigned Managed Identity and select our VM..
- Click Select, and then Review + assign.
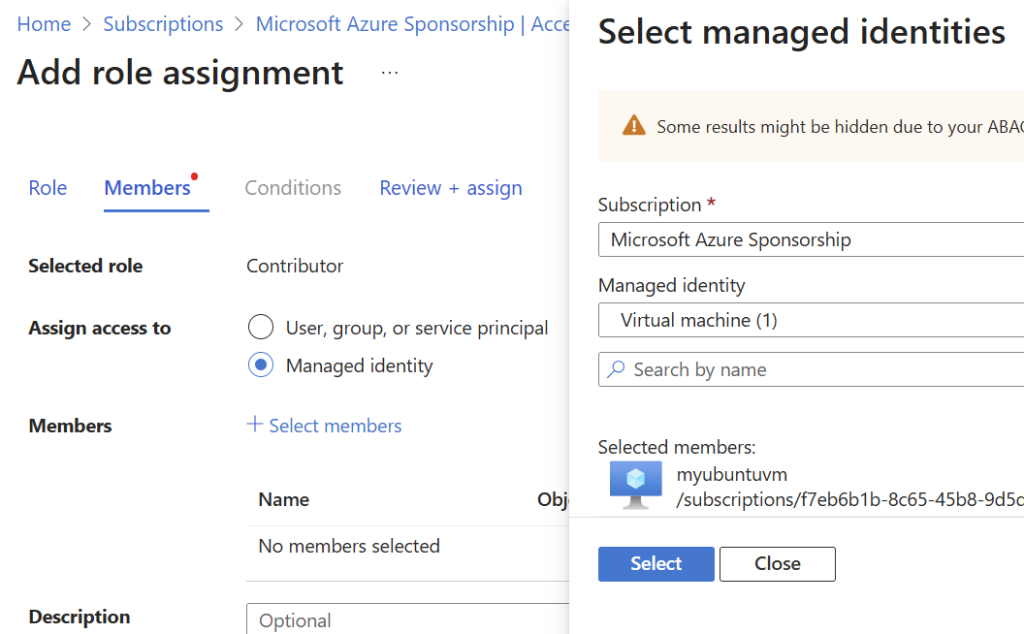
✅ Your VM’s managed identity now has the required permissions at the selected scope.
Note:
The same steps work at any level — Management Group, Subscription, Resource Group, or individual Resource — depending on how broadly you want to apply permissions.
Always assign roles using the principle of least privilege to maintain security.
🧩 Step 4: Use the Identity in Your Code (Optional)
Inside your VM, your application can use Azure’s built-in Managed Identity Endpoint to get a token without any passwords.
For example, using the Azure CLI:
az login --identity
Or in Python:
from azure.identity import ManagedIdentityCredential
credential = ManagedIdentityCredential()
Your code can now authenticate securely to other Azure services!
✅ Summary
| Step | Action | Description |
|---|---|---|
| 1 | Go to your VM | Find the VM in Azure Portal |
| 2 | Enable Identity | Turn on System or User Assigned Identity |
| 3 | Assign Permissions | Grant access to services like Key Vault or Storage |
| 4 | Use in Code | Authenticate using ManagedIdentityCredential |
💡 Key Takeaways
- Managed identities eliminate the need to store credentials in code.
- Always use the principle of least privilege when assigning roles.
- System-assigned identities are deleted with the VM; user-assigned ones are reusable.