
Introduction
Virtual Machines (VMs) are the backbone of modern cloud computing. They let you run different operating systems, like Linux or Windows, without needing physical hardware. Among the various Linux distributions, Ubuntu is one of the most popular choices for developers, cloud engineers, and IT professionals because it’s lightweight, secure, and easy to manage.
In this guide, we’ll walk you through the step-by-step process of creating an Ubuntu Virtual Machine in Microsoft Azure, one of the leading cloud platforms today. You don’t need to be a cloud expert — this tutorial is designed for beginners who want to understand how things work in a simple, practical way.
By the end of this post, you’ll have your own Ubuntu 24.04 LTS virtual machine running in Azure, accessible via SSH, and ready for development or learning.
Why choose Ubuntu & what version to use
- The official long-term support (LTS) version of Ubuntu is 24.04.3 LTS (“Noble Numbat”) — supported until April 2029. LinuxConfig+2Ubuntu+2
- For Azure cloud workloads, LTS is recommended for stability and security.
- On Azure, you’ll find Ubuntu Server 22.04 LTS (Jammy Jellyfish) also commonly used. Microsoft Learn+1
- Recommendation: Use Ubuntu 24.04 LTS if available in your region; otherwise use 22.04 LTS.
Pre-requisites (Getting ready)
- You have an Azure subscription (or free trial) and access to the Azure Portal.
- You have basic Azure permissions to create a resource group, virtual machine, and network components.
- You are comfortable with SSH and basic Linux commands.
- (Optional) A public key for SSH login (strongly recommended vs password).
Step 1: Create the VM via the Azure Portal
- Sign in to the Azure Portal (https://portal.azure.com) and select “Virtual machines” → “Create +” → “Virtual machine”. Microsoft Learn
- Fill in the Basics tab:
- Subscription: choose your subscription
- Resource group: create a new one (e.g.,
rg-UbuntuVM) - Virtual machine name: something like
ubuntuVM01 - Region: choose a region near you (e.g., Canada Central)
- Image: select Ubuntu Server 24.04 LTS – Gen2 (or 22.04 LTS if 24.04 isn’t available) Microsoft Learn+1
- Size: pick a VM size suitable for your needs (e.g., Standard_B2s for light workloads)
- Authentication type: choose SSH public key (enter or upload your key)
- Username: pick something like
azureuser - Public inbound ports: allow SSH (port 22). If you’ll run a web server enable HTTP (port 80). Microsoft Learn
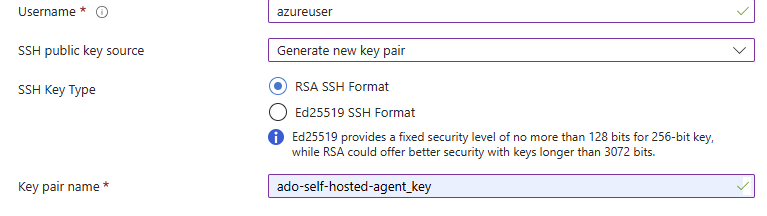
- Configure the other tabs (Disks, Networking, Management, Advanced, Tags) with defaults or as needed:
- Disks: default OS disk is ok, you might choose Premium SSD if performance matters
- Networking: ensure a public IP is created if you need access from the internet
- Management: you may enable boot diagnostics, auto-shutdown etc.
- Review + Create → click Create. The deployment takes a few minutes.
Step 2: Connect to the VM
Once the VM is running:
- Go to the VM’s overview page in Azure Portal → note the Public IP address.
- Use your terminal (on your local machine) and run:
ssh azureuser@<Public-IP>(Replaceazureuserwith your username and<Public-IP>with the actual IP). - On first login you’ll accept the host key; you’re now connected to your Ubuntu VM.
Step 3: Basic post-deployment setup
Now that you’re in the VM, do a few essential things:
sudo apt update
sudo apt upgrade -y
This updates the package list and installs security updates.
You might also:
- Create a non-root user with sudo access (if you prefer)
- Configure the firewall:
sudo ufw allow ssh sudo ufw enable - Install any software you need (e.g., Nginx, Docker, etc.)
Step 4: (Optional) Install a web server to test
To confirm everything works:
sudo apt install nginx -y
sudo systemctl start nginx
Then point your browser to http://<Public-IP> — you should see the “Welcome to nginx!” page.
This proves your VM is reachable, the networking allowed HTTP traffic, and system is running.
How it works (Behind the scenes)
- Azure uses a disk image (in the Marketplace) for Ubuntu Server.
- When you choose the image (e.g., Ubuntu 24.04 LTS), Azure copies the image, creates a VM (compute + disk + network).
- The SSH key you provided is embedded so you can log in securely.
- The VM is assigned a public IP (unless you disabled it), and a network security group (NSG) controls inbound/outbound traffic.
- When you run
apt update/upgrade, you’re pulling packages from Ubuntu repositories.
There’s more (Next steps)
- Automation: Use the Azure CLI or an ARM/Bicep template to create VMs programmatically. Microsoft Learn+1
- Managed Disks, backups, availability zones: For production you might care about VM uptime, redundancy, snapshots.
- Security hardening: Disable password login, restrict SSH to specific IPs, install Azure VM agent, update regularly.
- Custom images: You can create your own Ubuntu image with pre-installed apps and use it for VM creation. Microsoft Learn
- Monitoring & logging: Use Azure Monitor for logs/metrics, enable automatic updates with Azure-native tools.
Summary
You now have a VM in Azure running Ubuntu LTS, reachable by SSH, ready for you to deploy workloads.
Using the Portal is fast and simple — and once you’re comfortable, you can switch to CLI or IaC (infrastructure-as-code) for repeatable labs.